Light is the whole game: a working agent’s guide to listing-photo lighting
Of every variable in a listing photo, light is the one that does the most work. Get this right and the rest is composition. Get it wrong and no composition will save you.

If you were going to read one article in this guide and skip the rest, this would be the one.
Of all the variables that decide whether a listing photo earns the click — composition, framing, staging, post-processing, time of day — light does the most work. A well-composed photo in bad light is a flat, muddy, uninviting photo. A poorly composed photo in great light still gives the buyer something to look at.
The good news: light is the variable you have the most control over, because most of it comes from decisions you make before the shutter clicks. Time of day. Which lights to turn on. Where to stand relative to the windows. Whether to wait or shoot anyway.
Buyers care about lighting more than agents often appreciate:
The buyer is shopping for natural light. The photo’s job is to deliver it convincingly. This article is the working agent’s reference for the lighting decisions that make every other variable easier.
The natural-light hierarchy
Some times of day are dramatically better for interior photography than others. The hierarchy, from best to worst:
1. Overcast morning (best)
Soft, diffused light coming through every window evenly. No hard shadows, no glare, no harsh contrast between bright window and dark room corner. The sky acts as a giant softbox.
Most pro real-estate photographers will pray for overcast on the morning of a shoot. It’s the easiest light to photograph in and the most forgiving of small composition errors. If the forecast offers it, schedule the shoot for then.
2. Late afternoon, two hours before sunset
Warm, lower-angled light. Direct sun is still hitting windows but it’s at a flatter angle that doesn’t burn into the camera sensor the way midday sun does. The colour temperature is warmer, which reads as inviting on the camera.
The trade-off: long shadows. If the listing has a lot of glass on one side and the sun is hitting it directly, you’ll get strong cast shadows across floors and counters. Usually still better than midday, but check for them.
3. Midday (acceptable, with effort)
The sun is high, the windows are extremely bright, and the contrast between window-bright and interior-dim is at its hardest. Phone cameras struggle most here. You can shoot at midday — the exposure-lock trick (below) handles most of it — but it’s not your first choice. If the listing is flexible on timing, push the shoot to morning or late afternoon.
4. Evening (golden hour edge cases)
Strong, low-angle, very warm light. Beautiful for exterior shots, problematic for interiors because the light only hits one side of the house. Rooms on the east side at sunset are in deep shadow; rooms on the west are blasted with orange. Skip evening for interiors unless you’re specifically going for golden-hour mood shots.
5. After sunset / blue hour
The hardest condition. Modern phones with Night Mode (iPhone Pro models, recent Pixels) can produce usable interior shots with only interior lighting — but only with a steady platform (tripod or stable surface) and only in rooms with reasonable fixture coverage. The results are passable, not great.
For most listing work, treat after-sunset interiors as a situation to avoid scheduling. Either shoot during daylight or, if the daylight has gone, reschedule. The one exception is dusk exterior twilight, which is its own technique.
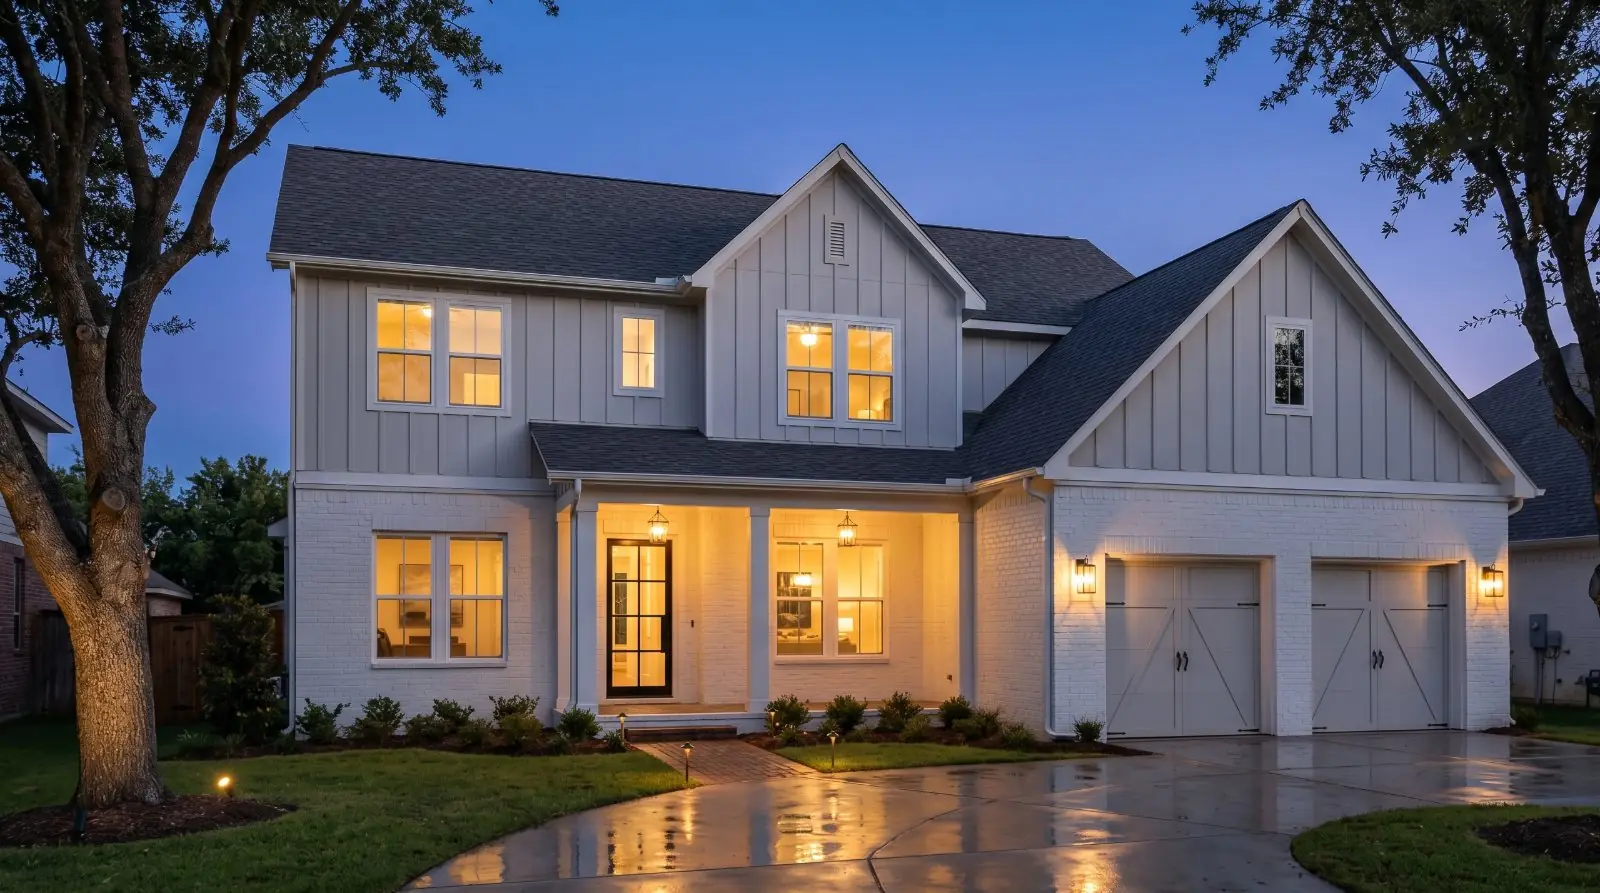
Every light on. Every time.
The single cheapest upgrade in real-estate photography is turning on every light in the listing before the shutter clicks. Every overhead, every pendant, every lamp, every sconce, every closet light if the closet is in the frame, every under-cabinet strip, every appliance light.
There are two reasons this matters more than agents expect. First, the camera’s dynamic range — the spread between brightest and darkest it can record in one frame — is smaller than the eye’s. The eye walks into a room and adjusts seamlessly between bright window and dark corner. The camera averages. Adding interior light reduces the contrast the camera has to handle, which means more detail in both the highlights and the shadows.
Second, interior light reads as welcoming in a way ambient daylight alone doesn’t. A room with the lamps on looks lived-in, warm, occupied. The same room with lamps off and only window light reads as cooler, emptier, more institutional. The buyer scrolling at 11pm reads “lived-in” as positive.
The rule: every light on, every time, no exceptions. This includes:
- — Every overhead fixture
- — Every pendant and chandelier
- — Every table and floor lamp
- — Every under-cabinet strip in the kitchen
- — Every closet light if the closet door is open in the frame
- — The hood light over the range
- — Every bathroom light, including the makeup mirror lights
- — Every appliance light that’s visible (microwave interior if the door is glass)
- — Every outdoor porch light and landscape uplight, if shooting exteriors at twilight or evening
The five minutes it takes to walk the property and flip every switch is the highest-leverage five minutes you’ll spend on the listing photos.
The window-exposure trap
Nearly every interior listing photo has the same problem: windows are much brighter than the rest of the room. The phone’s auto-exposure tries to handle this and almost always makes the wrong choice — usually averaging everything into a muddled mid-tone, sometimes blowing out the window to pure white, sometimes crushing the interior to black. The fix is two seconds and takes more practice to remember than to execute.
On iPhone
- Open the camera.
- Frame the shot.
- Tap and hold on the brightest area of the frame — the window itself, or the brightest counter or wall directly lit by it.
- A yellow box appears with AE/AF LOCK at the top of the screen. The exposure and focus are now locked.
- Recompose your shot (slide the camera back to the framing you want) and shoot.
- Tap once anywhere on the screen to release the lock when you’re done.
On Pixel / recent Android
- Open the camera.
- Tap on the brightest part of the frame to set focus there.
- An exposure slider appears next to the focus point. Drag it down until the window detail returns.
- Recompose and shoot.
The result, in both cases: the window is exposed correctly (you can see through it to the outside), the bright surfaces are detailed instead of blown out, and the interior — already filled in by the lamps you turned on — reads as the room actually looks.
This single technique, combined with every-light-on, is responsible for the difference between an MLS photo that reads as amateur and one that reads as professional. There’s no third lever. Light and exposure are the whole game.
A note on HDR
Modern phones have High Dynamic Range (HDR) capture that combines multiple exposures into a single image automatically — handling the bright-window-dark-interior problem the same way exposure-lock handles it manually. HDR is on by default on most recent iPhones and Pixels, and it works well enough that some agents lean on it and skip the exposure-lock step entirely.
The honest framing on which to use:
- Exposure-lock (manual) is more reliable for important shots. You choose the reference point. The phone executes. The result is predictable.
- HDR (automatic) is the right call when you don’t have time to lock manually, when the window dominates so much of the frame that locking is awkward, or when shooting quickly in changing light. The result is less predictable but usually acceptable.
- Both work better together. Exposure-lock with HDR on gives the phone the most data to work with and the most reliable result.
Why steadiness matters more in low-light shots
Both HDR and Night Mode rely on the camera capturing multiple exposures in quick succession and combining them. If the phone moves between exposures, the result is a blurry or ghosted image — even when each individual frame would have been sharp.
In bright rooms the differences between exposures are milliseconds and most agents can hand-hold without issue. In dim interiors (basements, north-facing rooms, dusk shoots) the exposures take longer and even a small hand-shake produces visible blur.
Practical fix: in any low-light situation, brace the phone. Lean against a doorframe. Rest your elbows on a counter. Bring a $25 mini-tripod for genuinely dim conditions. The agents shooting their own basement and twilight photos most often discover that the same shot they couldn’t get hand-held works on a tripod with the same camera at the same settings.
Mixed light: when interiors and exteriors fight
A room with both window light (cool, daylight-colour) and interior lamps (warm, tungsten-colour) is in mixed light. The camera has to pick a white balance, and whatever it picks will look slightly wrong in the parts of the frame lit by the other light source.
Three approaches:
- Let the warmth win. Set the white balance manually to the warmer end. The windows will read slightly blue but the interior glow will read warm and inviting. Usually the right choice for living rooms, bedrooms, and any room where you want emotional warmth.
- Let the daylight win. Set white balance to the cooler end. The interior lamps will read slightly yellow but the daylight will read accurate. Usually the right choice for kitchens and bathrooms where you want clean, accurate colour.
- Replace the warm bulbs with daylight-temperature bulbs. A 10-minute change for the seller before the shoot. 5000K LED bulbs match the colour temperature of daylight and eliminate the mixed-light problem entirely. Not always practical, but the cleanest solution when the seller is willing.
For the working agent doing their own photos, options 1 and 2 are the realistic choices. Pick deliberately based on what the room is trying to say.
The flash off the phone — when (essentially never)
The single piece of camera hardware that ruins more interior real estate photos than any other is the phone’s built-in LED flash. Phone flash is designed to be a fill light for short-distance casual snapshots — kids on a birthday cake, a friend in a dim bar. It is not designed for, and not useful for, the geometry of an interior listing photo.
For interior real estate photography, the flash should be off in almost every situation. Phone flash creates:
- — Hot spots and harsh shadows. The light source is small and close to the lens, so anything near the camera gets blasted bright and anything further away falls into deep shadow. The room reads as flat and uneven rather than balanced.
- — Glare on mirrors, stainless steel, glossy tile, and glass. Every reflective surface in the room becomes a bright reflection of the flash — most visibly in bathrooms (mirror), kitchens (appliances), and any room with chrome fixtures or a glass-fronted cabinet.
- — A “snapshot photography” signal. The visual register of a flash-lit interior is unmistakable. Buyers read it as amateur immediately, before they consciously identify why.
- — Distorted white balance. Phone flash is cool (around 5500K) and overwhelming. Mixing it with the warm interior lights you turned on creates exactly the kind of mixed-temperature problem the previous section was about — but worse, because the flash dominates the foreground entirely.
The honest workflow: leave the flash off. If a room is too dark for a clean shot: first, turn on every light in the room. If still too dark, bring in portable continuous light — a $25 LED panel, a clip-on work light, even a desk lamp from elsewhere in the house. Continuous light is photographically useful in a way phone flash is not. If still too dark, shoot in RAW and recover the shadows in post. Last resort: reschedule for better natural light. Better than a flash-lit photo.
The genuine exceptions where phone flash is acceptable: a small fill in a utility space (a basement utility room, a closet interior) where no other light source exists and the shot is documentary, not editorial; very specific detail shots of a small object on a dark surface. For every other shot in a listing — kitchens, bathrooms, living spaces, bedrooms, exteriors — the flash stays off.
When to wait, when to shoot anyway
The general principle: bad light is recoverable. Bad staging, bad weather damage, and bad timing are not. If the only problem is the light is harder than ideal, work with it. If the problem is anything else, reschedule.
The weather you can’t fix
Some lighting situations have honest solutions in post-processing, not on-site:
- — Flat, grey overcast skies on exterior shots. Sky replacement, with disclosure.
- — Dim interiors with no time to wait for better light. Brightness and shadow recovery in post.
- — Mixed-light colour casts you couldn’t control on-site. Selective white-balance correction in post.
- — Hard window glare you couldn’t lock exposure around. Window-detail recovery in post.
Each of these requires disclosure if the edit substantially changes how the room reads.
Lighting balance, shadow recovery, window-glare fixes — handled.
Phone photos to market-ready listing images in 10 seconds. Twenty free when you sign up — no credit card.
One photo tip every Sunday.
Real techniques agents are using this week. No spam. Unsubscribe in one click.