The front-of-house photo: how to nail the shot that decides whether anyone clicks
It’s the first thumbnail on every listing site. Get this one wrong and the buyer never sees the kitchen.
There is no photo in a listing that does more work than the front exterior. It’s the thumbnail in every search result, the cover image on every social share, the first impression every buyer forms. The kitchen, the bathroom, the primary bedroom — none of those photos get seen by a buyer who scrolled past the front-of-house shot without clicking.
A front-of-house photo is doing three jobs at once: showing the house, suggesting the neighbourhood, and giving the buyer a moment of “I could live here.” Most amateur front-of-house photos do the first one and skip the other two.
The data on how much weight that single thumbnail carries is the kind of thing every working agent should have at the top of their head:
A frequently-cited Zillow finding puts the gap on engagement at roughly 47% more views per listing when the photography quality is high versus when it isn’t. The thumbnail isn’t just the first impression — for most listings, it’s the only impression. The buyer who scrolls past the thumbnail never sees the kitchen photo you spent 20 minutes setting up.
This article covers the four variables that decide whether the front shot earns the click — time of day, where to stand, the curb, and the sky — and what to do about the conditions you can’t change.
Time of day, by orientation
The most important variable in any exterior shot is the angle of the sun relative to the front of the house. The rule: the sun should be lighting the front of the house, not the back. That means the sun has to be on the same side of the house as the photographer — which, in the northern hemisphere, mostly means the sun has to be in the southern sky and the photographer has to be on the south side of the house. The exact times depend on which way the front faces.
A small piece of geometry to keep in mind: in the US, the sun rises in the east, peaks in the south, and sets in the west. It’s in the southern sky for most of the day. Which side of the house catches direct sun, and when, depends on which direction the front is pointing.
For most houses, late afternoon — roughly 2–3 hours before sunset — is the safest default when the orientation allows it. The light is warmer, lower, and easier on the camera than midday. Long shadows from the photographer or the trees become a consideration, but those are usually fixable by repositioning.
Where to stand
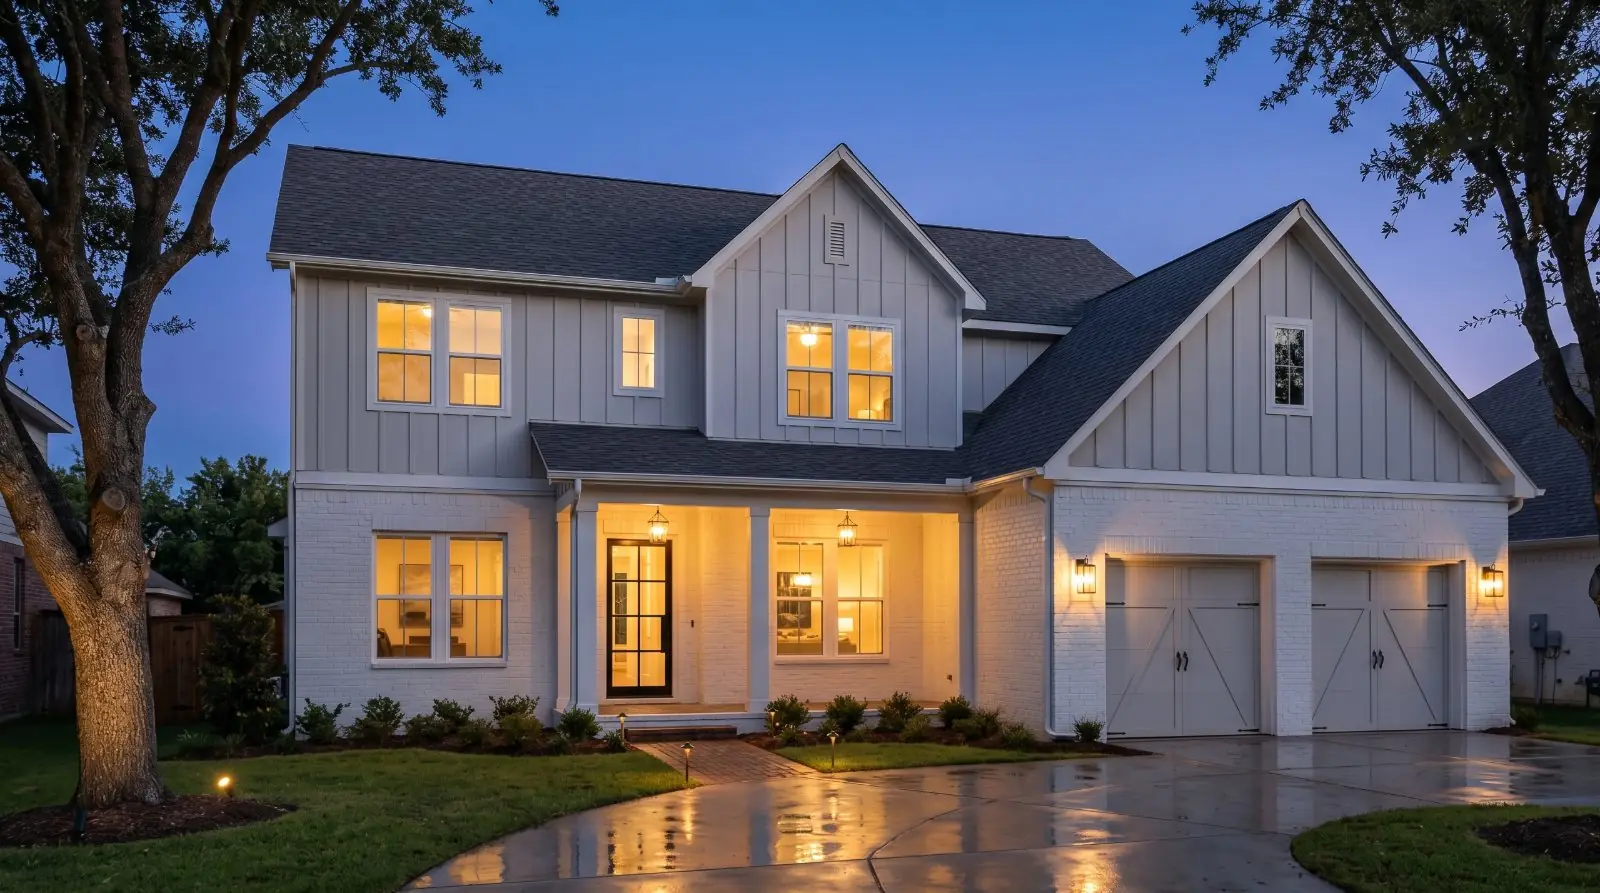
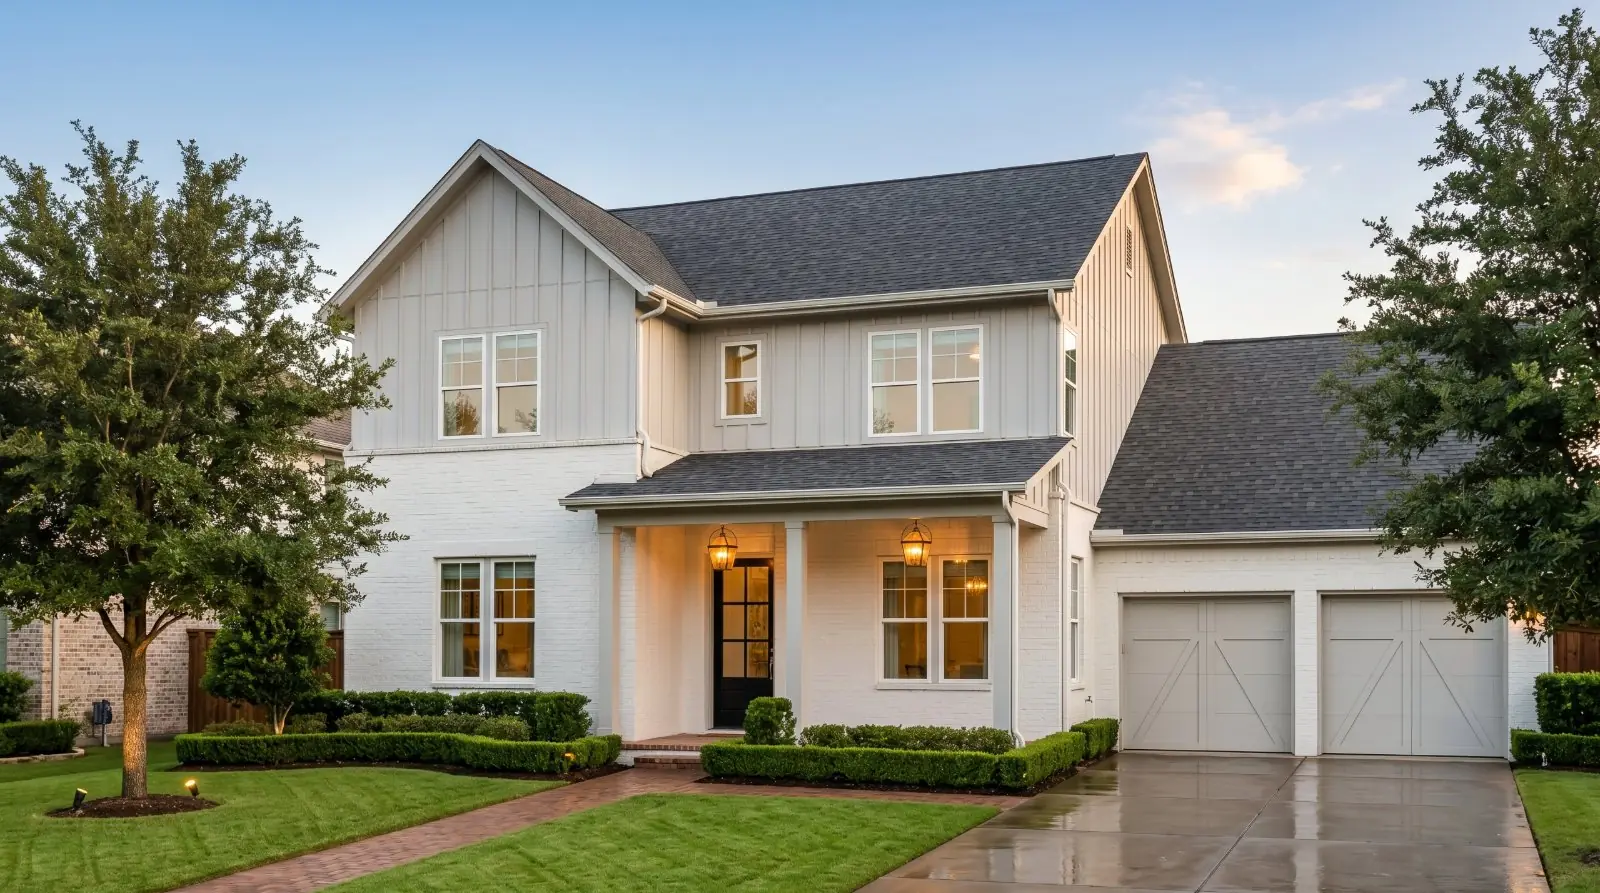
The single most common amateur tell on a front-of-house shot is standing directly in front of the house and shooting straight on. Straight-on is flat. The house has no depth. The yard has no recession. The whole image reads as a real-estate-listing screenshot from 2008.
The pro move: stand at a three-quarter angle off the front corner of the house, with the front door and at least one side of the building visible. The depth shows. The roofline reads as a roofline, not a line. The house feels like an object, not an elevation drawing.
How far back — let the screen tell you
There’s no universally correct distance. A 25-foot distance that frames a single-story ranch beautifully is too close for a two-story colonial. A 40-foot distance that captures a large two-story home leaves a small single-story looking lost in the middle of a lawn.
The reliable approach is to let the phone screen tell you when the framing is right. Three things to check on the screen before you press the shutter:
- The house fills roughly 70–80% of the frame width — comfortably bordered, not pressed against the edges, not lost in the middle.
- The roof sits within the top third of the frame — fully visible, not cropped at the eaves, with sky breathing room above.
- The bottom of the frame includes a few feet of lawn, walk, or driveway as a foreground anchor — not just the house starting at the bottom edge.
If those three things look right on the screen, you’re in the right spot. Walk forward or back until they do.
A starting position if you want one
If you’d rather walk to roughly the right distance first and fine-tune by eye from there, the working ranges by house size:
These are starting positions. Walk out, raise the phone, check the three framing rules above, adjust.
Pacing it out
If you don’t carry a tape measure (most agents don’t), an adult’s natural walking step is a reasonable substitute. A natural step is roughly 2.5 to 3 feet, depending on height. A 6'1" person tends toward 2.7–3 feet per step; a 5'4" person tends toward 2.2–2.5 feet.
Quick conversions: 5 paces ≈ 13–15 feet (single-story starting distance). 10 paces ≈ 25–30 feet (standard two-story). 15–18 paces ≈ 40–50 feet (luxury). For a more precise calibration: park next to a standard sedan (most are 15–16 feet long), pace its length while counting, and divide. Three or four pacing drills against vehicles of known length and you’ll have a reliable personal pace. SUVs run 17–18 feet; full-size pickups 19–20 feet; standard parking-space stripes are 18 feet.
Phone height
Hold the phone at chest height — same rule as interiors. Eye-height pulls the foreground up and crushes the house. Chest-height keeps proportions honest.
When to use ultra-wide and when not to
For most front-of-house shots, the standard 1× lens is the right call. Phone ultra-wide lenses (0.5× on iPhone) introduce visible distortion at the edges — particularly the lean-back effect on tall structures and the bowing of straight lines along the roof and the lot.
Use ultra-wide only when the lot is genuinely too small to back up with the standard lens, when the house is unusually wide (long ranch, wraparound bungalow), or when you’re shooting a luxury home where dramatic exaggeration of scale is a deliberate choice. The default is 1×. Ultra-wide is a problem-solver, not a default.
A note on file format
For most working agents, shooting in the standard JPEG (or HEIF) format the camera defaults to is fine. The image goes to the AI-enhancement step, then to the listing.
If you’re shooting in difficult light — strong contrast between bright sky and dark house, deep shadows you want to recover, mixed warm-and-cool light — there’s a case for shooting in RAW (or ProRAW on iPhone Pro models). RAW files capture more of the data the camera sensor saw, which means more flexibility in post-processing. The trade-offs (file size, storage, slightly slower shutter, workflow complexity) are real and worth understanding before you flip the switch.
The curb
Ten minutes of prep before the shoot — bins behind the side gate, hose coiled, walk swept, lawn quickly trimmed, cobwebs knocked down, dead bulbs replaced — does more for the photo than any post-shoot edit.
A note on privacy and security
The exterior shot is a public-facing image and the gallery will live on Zillow, the MLS, and a half-dozen syndication sites essentially forever. A few things worth keeping out of the frame for the seller’s safety: alarm keypads and the front-door keypad in detail; hidden-key locations (a fake rock, a key under a mat); house numbers combined with very specific identifying features (the address is public information, but composing so the house number is small and incidental is fine); and on interior shots taken from the side or back, visible alarm panels, gun safes, or expensive electronics framed in window views.
The sky
The sky is the variable you have the least control over and the largest influence on the final image. A bright, lightly clouded sky reads as warm and inviting. A flat overcast sky reads as grey, low-energy, and washed-out. Heavy clouds read as bad weather and dim the whole front of the house.
Three honest options for an overcast day. Reshoot if the listing isn’t on a tight deadline and the forecast for the next 48 hours is better — the single best exterior fix is patience. Shoot anyway and replace the sky in post: sky replacement is a legitimate edit when disclosed under NAR Articles 2 and 12, and done well it’s indistinguishable from a sunny-day reshoot. Lean into the overcast: soft, even light is actually flattering for certain architectural styles — modern, midcentury, dark-painted exteriors. The grey sky just becomes part of the mood.
The disclosure conversation matters here. A rendered sky requires an “AI-enhanced” or “image-edited” disclosure in the MLS remarks or the agent’s standard listing statement.
Landscaping and seasonality
There are three categories of landscaping problem. Knowing which category you’re in tells you whether the fix is a 10-minute on-site cleanup, a disclosed post-shoot edit, or something you can’t honestly fix at all.
Category 1 — Fix it on-site in 10 minutes
Trim the visible front bushes and shrubs (just the ones the camera will see). Clear leaves and debris from the walk and the driveway. Pull obvious dead flowers or weeds out of the front beds. Move flowerpots into the frame if the front step looks bare — or out of the frame if cluttered. Coil the hose. Roll up the kids’ bikes. Move the trash bins.
Category 2 — Fix it in post, with disclosure
Conditions you can legitimately render with AI tools, but which cross into “material alteration” under NAR Articles 2 and 12 — which means they require disclosure. A leafless tree in winter. Can be rendered with leaves; this is a seasonal alteration. The buyer arriving in February to a leafless lot may feel the photo overpromised. A brown lawn in a drought year. Same category. Same disclosure requirement. A flat, overcast sky. The most common AI edit and the most clearly permissible-with-disclosure. A patch of bare grass or a worn driveway corner. Can be rendered cleaner. Disclose it.
The general principle: an edit that changes the condition of the property at the moment of listing is borderline. Disclose carefully.
Category 3 — Don’t fix at all
These aren’t things you “can’t” fix in a technical sense — modern AI tools can do almost any of them. They’re things you shouldn’t fix because doing so crosses from “enhancing the photo” into misrepresenting facts about the property. A construction project on the lot next door. A fact the buyer will encounter the moment they pull up. The neighbour’s house in the frame. Part of the property’s permanent setting. Power lines, cell towers, or utility infrastructure. Permanent facts about the location. A busy road, a railway line, a commercial building behind the lot. Compose around them. Structural damage, peeling paint, a missing fence section. The seller fixes them, or the listing discloses them.
For Category 3 problems, the answer is composition, not editing. A tighter crop on the house alone, a three-quarter angle that puts the bad neighbour out of frame, a shot from the front lawn that makes a leafless tree a foreground frame instead of a background distraction. These are composition decisions. They cost nothing and they don’t require disclosure because they’re not edits.
Seasonal consistency across the gallery
Every photo in the gallery should read as the same season. If the front exterior was shot in October with golden leaves and the backyard was shot in March with bare branches, the buyer notices instantly and the listing reads as cobbled together. Three options: shoot everything in one session; if you have to reshoot one element, match conditions to the rest of the gallery; or, if conditions have genuinely changed, use the seasonally-consistent set and be honest in the listing description.
The twilight option
Twilight shots of the front exterior — warm interior lights glowing through the windows, the sky a deep dusk blue — are the signature shot of every high-end listing. Traditionally a 90-minute commitment with a tripod, a careful exposure setup, and two trips to the property. A phone-first alternative exists: shoot the exterior in flat daylight, render to twilight in post, disclose the edit.
Twilight isn’t right for every listing. Modest exteriors and houses without strong interior-light geometry don’t earn it. Listings under $400K, in most markets, don’t either — the audience reads twilight as a luxury cue. Match the shot to the listing.
Matching the shot to the listing tier
Front-of-house photography priorities shift by price point. Treating a $250K starter home and a $2.5M waterfront the same in the photo is one of the most common ways a listing’s photography signals “this agent doesn’t know the segment.”
Affordable / starter listings (under ~$400K)
The job of the photo is to communicate warmth, cleanliness, and functionality — not aspirational luxury. Lean into clean, well-maintained presentation over dramatic mood. Skip twilight rendering: the luxury cue reads as overselling and erodes trust. A bright daylight front shot with a well-mowed lawn and a clean driveway outperforms a moody dusk shot every time at this price point. Don’t over-edit. In this segment, over-editing reads as covering for problems.
Mid-range listings (~$400K–$1M)
The bulk of US residential listings live here. The job is to communicate quality and character without overselling. The standard recommendations in this article apply unmodified. Twilight rendering is acceptable if the listing has the architectural features to support it (interior light geometry, a strong front silhouette). Disclose it. A second exterior angle — wide context showing the lot, the trees, the setting — is usually worth a slot in the gallery.
Luxury listings ($1M+, definitively at $1.5M+)
The job is to communicate arrival experience, architecture, and lifestyle. The twilight or blue-hour exterior is essentially mandatory at the upper end. The render-from-daylight approach gets you there without two trips, with disclosure. The “arrival experience” — the gate, the long drive, the entry sequence — earns its own shot. Drone and aerial shots are standard. Restraint matters more here: over-HDR, over-saturation, or cartoonishly clean rendering reads as cheap at this tier.
The drone question
For listings where a drone shot earns its place — large lots, pools, views, waterfront, hilltop properties — a few principles. The two drone shots that almost always earn their slot: the 45-degree hero shot (drone elevated to roughly second-story rooftop height, angled down at about 45 degrees, framing the house and the immediate lot), and the straight-down lot shot (drone directly overhead at sufficient altitude to show the entire lot boundary, useful when the lot itself is a selling point).
What to avoid: spinning aerials, rapid pans, or any “video-game” camera moves. Drone shots that reveal information the seller wouldn’t want public (a security gate code visible from above, the route to a private dock). Aerial shots taken at the wrong time of day — drone shots have the same lighting requirements as ground-level exteriors.
Legal: US commercial drone use requires FAA Part 107 certification or working with a licensed pilot. Confirm the listing is not in restricted airspace. The drone operator should handle this; if you’re the operator, do the research before the shoot. For affordable and mid-range listings, drone work is usually overkill. For luxury and view properties, it’s table stakes.
The backyard and the rest
The front-of-house shot is one image. The exterior story usually requires three or four: front exterior (this article), backyard / pool / deck (separate article), a wide showing the house in context — the lot, the trees, the setting — if the property warrants it, and a drone or elevated shot if the listing earns one. For most standard listings, the front-of-house and one backyard shot is enough. Don’t pad the gallery with weak exterior shots to hit a count. A buyer scrolling Zillow at 11pm has eight seconds. Show them the best four.
Sky replacement, exposure cleanup, disclosure handled. One step.
Phone photos to market-ready listing images in 10 seconds. Twenty free when you sign up — no credit card.
One photo tip every Sunday.
Real techniques agents are using this week. No spam. Unsubscribe in one click.